VPN connection between two local networks
 You can also use a VPN to unite two existing local networks into one. For that, you set up a VPN bridge in both local networks, and use a cascade connection to link both bridges to the Virtual Hub. You can also use a VPN to unite two existing local networks into one. For that, you set up a VPN bridge in both local networks, and use a cascade connection to link both bridges to the Virtual Hub.
At the beginning
Usage example
With the VPN connection between two LANs explained on this page, you can connect several LANs at different, remote locations by a VPN, and use them as if they were one, united network.
Especially in networks that can't be reached from the Internet on a fixed global IP, the VPN Online Test Environment can be used as the foundation for a VPN. You can connect one Layer 2 segment, that is, one local Ethernet, over the public Internet to another segment right on the Layer 2 level.
This way, a route over the Internet can be established, just by using a comparatively cheap broadband connection, instead of an expensive leased line or similar WAN. The security is even higher than with a leased line or frame relay service offered by telecommunications companies, as all transferred data is encrypted via SSL.
Overview
Install a VPN bridge PC with PacketiX VPN 2.0 Bridge (freeware) in the local LANs that you wish to connect. Then create a bridge connection from the bridge PCs to the VPN Online Test Service and a local bridge connection from the bridge PCs to the local networks.
You can establish a VPN connection over the Virtual Hub, even if a local LAN is behind NAT, a proxy or a firewall.
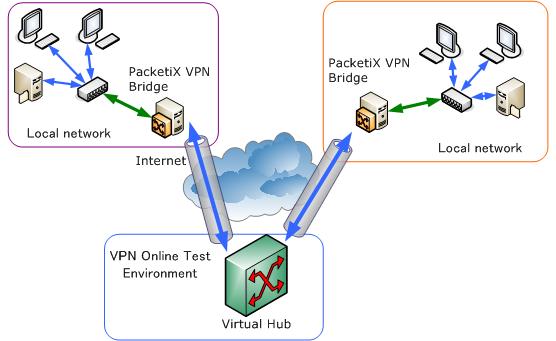
In the above diagram, LANs at two sites are connected to the Virtual Hub on the VPN Online Test Environment by a cascade connection from one PC each, with PacketiX VPN 2.0 Bridge is installed.
It is not necessary to install VPN Client Software or configure the network settings on individual PCs on the LAN.
All VPN traffic between the sites is encrypted, so it can't be eavesddropped or manipulated by third persons.
Merits and Demerits of connecting two LANs by a VPN
Lets have a look at the advantages and disadvantages of connecting two local networks by a VPN bridge.
Merits of using a bridge connection
It is easy and convenient to create a Layer 2 VPN bridge connection between two sites by PacketiX VPN. It has the following merits:
- All data transfer between the two sites is handled directly on Layer 2, so it has the same characteristics as if it was routed over a physical switching hub and very long cables.
- Not only TCP/IP, but all protocols that can be used over a physical Ethernet can be used over the VPN, such as NetBEUI and IPX/SPX as well as older legacy protocols.
- All kinds of devices can be used over the VPN, not only PCs. This is true especially for devices where a VPN Client can't be installed, such as printers and VoIP phones. You can even use devices that use other protocols than TCP/IP, such as security cameras, switching hubs, digital house appliances, and even industrial sensors and machinery.
- Since the VPN can be constructed without using IP routing, the structure of the network can remain simple.
Demerit of using a VPN bridge
At the same time, using a bridge connection also has demerits.
When connecting two LANs by a bridge on the Layer 2 level, basicly both networks become one.
When adding a new local LAN to an existing VPN, you have to either adjust the network topology and the assigning of IP addresses on the existing LANs, or you have to find a way to separate the network in to segments. There are also a number of smaller issues, such as that more PCs on the network means more traffic from broadcast packages and similar.
Changing an existing network's topology can result in a lot of work, especially if manually assigned fixed IPs are involved.
A better solution to the problem is to use IP routing and the Virtual Layer 3 Switch function included in PacketiX VPN 2.0 Server to separate the VPN into segments. See the PacketiX Online Manual Chapter 10.6, Setting Up a LAN-to-LAN VPN Using IP Routing for details on how to achieve this.
Practical Procedures
The following explains how to use the PacketiX.NET VPN Online Test Environment to create a VPN connection between two LANs.
1. Create a Virtual Hub
First, create a Virtual Hub on the VPN Online Test Environment. Once the Virtual Hub is created, log in to the administration page to configure it.
2. Create users
At the start, there are no users created in your Virtual Hub. Thus, no client can connect to the hub yet.
You can create a user if you click "User administration" on the administration page, and "Create a new user" next.
First, create a special user to use for connecting the PacketiX VPN Bridge to the Virtual Hub of the VPN Online Test Service. We recommend to use an easy to understand name like "bridge".
You can either use the same user on both VPN bridge computers, or create one user for each bridge, say, "bridge1", "bridge2" and so on.
When creating users, you need to keep the following in mind.
- User name
Only alphabet letters, numbers and a few symbols are allowed.
- Password
If you set users on "Standard Password Authorization", you need to decide a password. Users need this password to connect to the Virtual Hub.
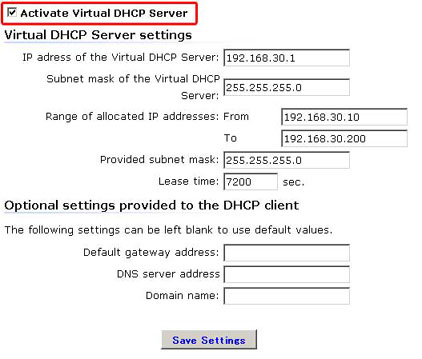
3. Disable the Virtual DHCP Server
For this example, we use bridges to connect several physical local Ethernet to one network on the Virtual Hub.
By default, Virtual LAN cards that connect to the Virtual Hubof the VPN Online Test Environment are assigned an IP address in the 192.168.3.10 - 192.168.3.200 range by the Virtual DHCP Server of the Virtual Hub.
Yet, in the present case, this is unwanted, as the Virtual DHCP Server interferes with the DHCP Server on the physical, local LANs. This can lead to network problems. The easiest solution is to switch off the Virtual DHCP Server on the Virtual Hub.
To switch off the Virtual DHCP Server, go to the Virtual Hub DHCP Server Settings in the menu of the Virtual Hub administration pages, and mark off the checkbox behind "Use Virtual DHCP Server". Then click "Save Settings".
4. Set up PacketiX VPN Bridge 2.0 on the local LAN
Install PacketiX VPN Bridge 2.0 on one PC on the physical LAN that you wish to connect to.
You can download the latest version of PacketiX VPN Bridge 2.0 from the PacketiX Download Center. The software is freeware.
After the installation, create a cascade connection to the VPN Online Test Environment, as described in PacketiX VPN Bridge Installation and Settings on the Virtual Hub administration pages.
Further, see Chapter 3.6 of the PacketiX Online Manual on how to create a local bridge between the Virtual Hub of PacketiX VPN Bridge 2.0 and the physical local network.
Testing the remote access VPN connection and data transfer
After the setup of the VPN is finished, try to access a PC or resource at the other local LAN to see whether the connection is working. The most basic test is to try to ping a local network address on the other LAN.
 Back to Top of Help
|