VPN connection between two PCs
 By connecting two or more computers over the Virtual Hub, you can share files, talk over video phone, access systems via remote desktop and do many other things you could do with PCs connected over local network. By connecting two or more computers over the Virtual Hub, you can share files, talk over video phone, access systems via remote desktop and do many other things you could do with PCs connected over local network.
At the Beginning
Usage Example
The VPN connection between two PCs explained on this page can be used in the following ways:
- Use files in a Windows shared folder over the Internet.
- Share self-created music and artwork in a small community
- Use video phone software, IP phone software, and IP messengers
- Use remote desktop and remote control software
- Create a virtual network when building a physical network is difficult
- When you want to play a game over the Internet that only offers a multiplayer over the local LAN.
- Transmitting television broadcasts and video streams over the Internet that could only be sent over the local network before.
- Use an application over network and Internet which has problems to pass NAT, proxy servers and other obstacles.
- Network testing
- Others
Especially if your computer is behind a NAT or proxyserver and can't be accessed directly from the Internet, you can use the Virtual Hub of the VPN Online Test Service as a gateway.
Overview
If you install the VPN Client software on 2 or more computers, you can transfer data freely between each computer by connecting them to the same Virtual Hub at the same time.
Even if computers are at distant places, or within networks sparated by proxy servers and firewalls, you can install a virtual network between the computers.
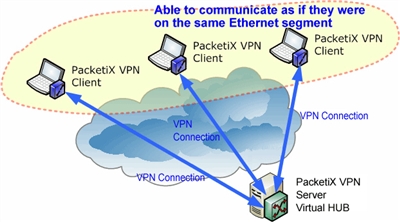
In the above example, three client computers are connected by the VPN. This way, data can be transferred securely between the three machines. All data is encrypted via VPN, and can't be eavesdropped or manipulated on the network in between.
Practical Procedures
Use the following settings to connect PCs to the VPN Online Test Environment.
1. Create a Virtual Hub
First, create a Virtual Hub on the VPN Online Test Environment. Once the Virtual Hub is created, log in to the administration page to configure it.
2. Create users
At the start, there are no users created in your Virtual Hub. Thus, no client can connect to the hub yet.
You can create a user if you click "User administration" on the administration page, and "Create a new user" next.
You can either create one user for each individual computer that you wish to connect to the Virtual Hub, or use one user for several or all PCs.
Yet, if you plan to use the Virtual Hub with a large number of users, we recommend to create one Virtual Hub user for each user on each PC.
When creating users, you need to keep the following in mind.
- User name
Only alphabet letters, numbers and a few symbols are allowed.
- Password
If you set users on "Standard Password Authorization", you need to decide a password. Users need this password to connect to the Virtual Hub.
3. Connecting to the VPN from the Client Computer
You connect to the Virtual Hub you created with Client Software installed on your computer.
See VPN Client Software Installation and Settings in the administration pages for detailed instructions.
VPN connection and data transfer test from remote location
IP address on the VPN after successful connection
After a client computer successfully connected to the Virtual Hub, its Virtual LAN card is automatically assigned an IP address in the range between 192.168.30.10 and 192.168.30.200.
Because it is assigned by the DHCP server of the Virtual Hub, this IP address can be used for data communication between the PCs on the VPN.
Also see details on the Virtual DHCP Server. You can disable the Virtual DHCP Server any time, and every Virtual LAN card can be manually assigned an IP.
Data transfer check by ping
You can use the ping command to check whether normal data transfer between VPN Clients connected to the same Hub is possible.
C:\>ping 192.168.30.11
Pinging 192.168.30.11 with 32 bytes of data:
Reply from 192.168.30.11: bytes=32 time=2ms TTL=128
Reply from 192.168.30.11: bytes=32 time=2ms TTL=128
Reply from 192.168.30.11: bytes=32 time=1ms TTL=128
Reply from 192.168.30.11: bytes=32 time=2ms TTL=128
Ping statistics for 192.168.30.11:
    Packets: Sent = 4, Received = 4, Lost = 0 (0% loss),
Approximate round trip times in milli-seconds:
    Minimum = 1ms, Maximum = 2ms, Average = 1ms
C:\>
|
But be careful, if a Personal Firewall program is installed on the computer that blocks ICMP packets, you can't use the ping command unless you reconfigure the firewall program.
Windows file sharing test
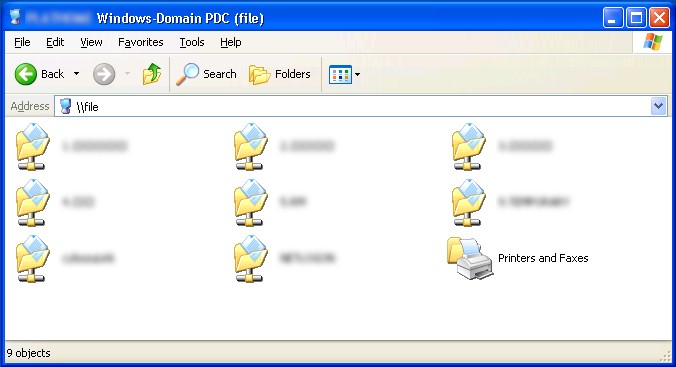
Within a VPN, you can perform Windows file sharing over a secure connection.
To test whether Windows file sharing works, we create a shared folder and try to access it from a different computer over the VPN.
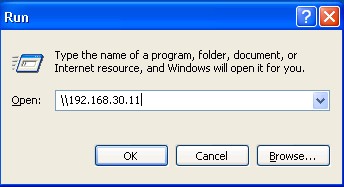
If two Windows computers are within the same Layer 2 segment of the network, you can perform name resolution with NetBIOS over TCP/IP broadcasts. DNS and WINS are not necessary in that case. That way, if the VPN is connected correctly, you can access that computer's shared folder by entering \\[computer name] in the Explorer address bar.
If the VPN is connected, but name resolution does not work properly, you can still access the shared folder if you enter \\[IP address].
Caution: If you have firewall software installed, make sure that the firewall does not block Windows file sharing or the necessary protocols (SMB and ICFS).
 Back to Top of Help
|