LAN remote access by VPN
 By setting up a VPN Bridge within a LAN, you can access the VPN from that LAN and vice versa. By setting up a VPN Bridge within a LAN, you can access the VPN from that LAN and vice versa.
At the Beginning
Usage Example
With the LAN bridge connection described on this page, you can allow PCs on a local network to access the VPN over a VPN Bridge you set up on the local network. This allows remote computers to access ressources on the LAN from remote, over the VPN.
Especially if the LAN you wish to access does not have a gateway with a global IP, you can use the VPN Online Test Environment Server as a gateway for remote access.
This way, you can access the LAN from remote over the Internet, as if plugging in directly by cable.
Overview
On the LAN, install the freeware PacketiX VPN Bridge 2.0 on the PC that should act as the VPN Bridge. Then, set up a cascade connection from the Bridge to the Virtual Hub of the VPN Online Test Environment Server. Then, create a local bridge between the Virtual Hub of the VPN Bridge and the physical LAN card in the bridge computer, to connect LAN and VPN.
Even if there are NAT, proxy or firewall between the local network and the Internet, the VPN makes it possible to connect to PCs on the LAN.
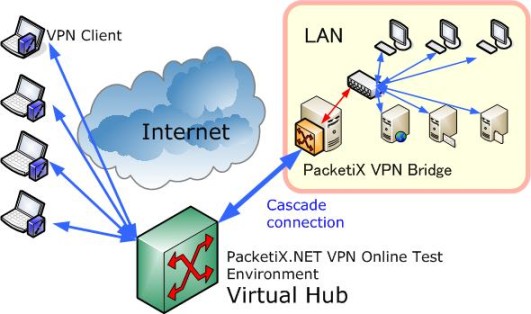
In the example above, the LAN is connected to the VPN Bridge via Local Bridge Connection, and the VPN Bridge is connected to the Virtual Hub of the VPN Online Test Environment over a so-called cascade connection.
Then, several client computers are connected to the Virtual Hub individually. On the Hub, each client computer is placed within the same network segment as the LAN, so each Client can access the LAN as if directly connected by an actual cable.
All transferred data is protected by encryption, so it can't be eavesdropped or manipulated on the network in between.
Practical Procedure
To use the VPN Online Test Environment to connect to a LAN from remote, use the following steps:
1. Create a Virtual Hub
First, create a Virtual Hub on the VPN Online Test Environment. Once the Virtual Hub is created, log in to the administration page to configure it.
2. Create users
At the start, there are no users created in your Virtual Hub. Thus, no client can connect to the hub yet.
You can create a user if you click "User administration" on the administration page, and "Create a new user" next.
First, create a special user to use for connecting the PacketiX VPN Bridge to the Virtual Hub of the VPN Online Test Service. We recommend to use an easy to understand name like "bridge".
Then, create users for the remote PCs that connect to the VPN later.
You can create either one user for all PCs or individual users for different PCs. If you plan to use the VPN with a large number of remote users, we recommend to create one Virtual Hub user for each user on each PC.
When creating users, you need to keep the following in mind.
- User name
Only alphabet letters, numbers and a few symbols are allowed.
- Password
If you set users on "Standard Password Authorization", you need to decide a password. Users need this password to connect to the Virtual Hub.
3. Disable the Virtual DHCP Server
For this example, we use a bridge to connect the physical local Ethernet and remote PCs to one network segment on the Virtual Hub.
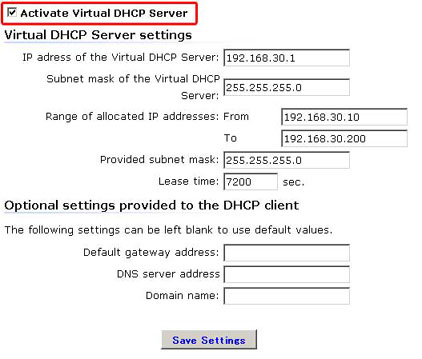
By default, Virtual LAN cards that connect to the Virtual Hub of the VPN Online Test Environment are assigned an IP address in the 192.168.3.10 - 192.168.3.200 range by the Virtual DHCP Server of the Virtual Hub.
Yet, in the present case, this is unwanted, as the Virtual DHCP Server interferes with the DHCP Server on the physical, local LAN. This can lead to network problems. The easiest solution is to switch off the Virtual DHCP Server on the Virtual Hub.
To switch off the Virtual DHCP Server, go to the Virtual Hub DHCP Server Settings in the menu of the Virtual Hub administration pages, and mark off the checkbox behind "Use Virtual DHCP Server". Then click "Save Settings".
4. Set up PacketiX VPN Bridge 2.0 on the local LAN
Install PacketiX VPN Bridge 2.0 on one PC on the physical LAN that you wish to connect to.
You can download the latest version of PacketiX VPN Bridge 2.0 from the PacketiX Download Center. The software is freeware.
After the installation, create a cascade connection to the VPN Online Test Environment, as described in PacketiX VPN Bridge Installation and Settings on the Virtual Hub administration pages.
Further, see Chapter 3.6 of the PacketiX Online Manual on how to create a local bridge between the Virtual Hub of PacketiX VPN Bridge 2.0 and the physical local network.
5. Connecting to the VPN from a remote client computer
Install and configure VPN Client Software on the PC you wish to connect to the Virtual Hub as below.
Use VPN Client Installation and Settings on the Virtual Hub administration pages for directions.
If you follow steps 1 to 4, your PC is connected to the Virtual Hub of the VPN Online Test Environment. Because you needed to disable the Virtual DHCP Server of the Virtual Hub above, your Virtual LAN card won't be assigned an IP address automatically by the hub. Yet, if there is an active DHCP server in the LAN you connected to, it is possible that your Virtual LAN card will receive an IP after all. If not, manually assign an IP address.
Data transmission test from remote access
When the remote access VPN installation and configuration is finished, try whether you can access the LAN from your client over the VPN. If there is a DHCP server on the remote LAN, it should have assigned an IP address to your Virtual LAN card. You can verify this with the ipconfig command on the command line.
If the LAN uses fixed IP addresses, you need to assign an IP address to your Virtual LAN card.
Use the ping command to check whether you can reach a PC on the LAN from the remote computer, and vice versa. Also check whether you can access any server installed on the LAN, such as a file server, mail server or data base server.
 Back to Top of Help
|